
Our hive has three bedrooms.
The master (which you've probably already seen - if you're new here or you missed that makeover you can check it out here), along with two other teeny ones currently awaiting revamps - one of which is more of a glorified cupboard (okay, so I'm exaggerating slightly though you get my drift - they are SMALL).
So anyway, the slightly less small of the two currently holds, amongst many other things, this big free standing TV cabinet (found on eBay for around $100):

Because instead of just a neat little laptop we have a hulking great computer with a massive monitor, printer, sound system, hard-drive back-up, broadband modem, etc, etc, there are a tonne of power cords and lots of poxy black plastic I'd rather hide away than have on show so here's what's actually living in that TV cabinet:

I know, I know, not too pretty at the moment - see what I mean about the cords? - though I do have beautification plans.
We've been using the computer like this for a while now, though to be honest, not very comfortably; the shelf heights are a bit awkward so you need to lean right over to reach the keyboard and mouse.
Well, I'm pleased to say that's finally changed thanks to the installation of this rolling shelf:
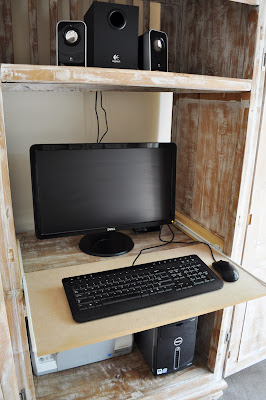
Again, still awaiting beautification though currently practical if nothing else!
I've always found purpose-built computer cabinets can be pricey (and usually lacking in character) so here's a quick little tute covering the basics of how you can turn any cupboard/cabinet/robe/closet into your own mini hide-away office.
Step 1
Find a cupboard. Almost anything will do. Just make sure it's big enough to house all your bits and pieces and really deep if you also want to leave a chair hidden in it. Like I already mentioned, my cupboard was originally a TV cabinet I bought off eBay for around $100.
Step 2
Install or remove fittings as required. I was lucky to already have some shelves in place though it's easy enough to add your own if need be.
Step 3
Install your keyboard shelf. Usually this would be hidden under the monitor shelf though based on the height of the existing shelf in my cupboard it needed to sit on top.
Because my cupboard has recessed sides, I first screwed (counter-sunk) and glued in some timber spacers:

Next I attached the exterior drawer slides:

These are just standard roller drawer brackets you can buy from the hardware store for around $10 a pair.
I then measured the depth, length and height my keyboard shelf needed to be and had a piece of MDF cut to size at the hardware store. I attached my MDF to the interior drawer slides by screwing it in from the bottom. To finish I simply inserted the shelf inside the exterior brackets:


Step 4
Make your new home office beautiful (and user-friendly :-)
Okay, I already admitted I'm still yet to complete this step though I do have some plans.


 Jem and Onyx


Because instead of just a neat little laptop we have a hulking great computer with a massive monitor, printer, sound system, hard-drive back-up, broadband modem, etc, etc, there are a tonne of power cords and lots of poxy black plastic I'd rather hide away than have on show so here's what's actually living in that TV cabinet:

I know, I know, not too pretty at the moment - see what I mean about the cords? - though I do have beautification plans.
We've been using the computer like this for a while now, though to be honest, not very comfortably; the shelf heights are a bit awkward so you need to lean right over to reach the keyboard and mouse.
Well, I'm pleased to say that's finally changed thanks to the installation of this rolling shelf:

Again, still awaiting beautification though currently practical if nothing else!
I've always found purpose-built computer cabinets can be pricey (and usually lacking in character) so here's a quick little tute covering the basics of how you can turn any cupboard/cabinet/robe/closet into your own mini hide-away office.
Step 1
Find a cupboard. Almost anything will do. Just make sure it's big enough to house all your bits and pieces and really deep if you also want to leave a chair hidden in it. Like I already mentioned, my cupboard was originally a TV cabinet I bought off eBay for around $100.
Step 2
Install or remove fittings as required. I was lucky to already have some shelves in place though it's easy enough to add your own if need be.
Step 3
Install your keyboard shelf. Usually this would be hidden under the monitor shelf though based on the height of the existing shelf in my cupboard it needed to sit on top.
Because my cupboard has recessed sides, I first screwed (counter-sunk) and glued in some timber spacers:

Next I attached the exterior drawer slides:

These are just standard roller drawer brackets you can buy from the hardware store for around $10 a pair.
I then measured the depth, length and height my keyboard shelf needed to be and had a piece of MDF cut to size at the hardware store. I attached my MDF to the interior drawer slides by screwing it in from the bottom. To finish I simply inserted the shelf inside the exterior brackets:


Closed....
....and open.
YAY!!! We can finally comfortably reach the components!
Step 4
Make your new home office beautiful (and user-friendly :-)
Okay, I already admitted I'm still yet to complete this step though I do have some plans.

Ready Made

Better Homes and Gardens

SUNSET Magazine

Pottery Barn

1000 Decorating Ideas Magazine 2007

Lowes

Unknown

Pottery Barn

Apartment Therapy
And thanks sooooo much to everyone who responded to my menial call for help from my previous post. I'm still getting around to contacting everyone who emailed or left a comment so please know I haven't overlooked your kind willingness to help :-)
You guys truly rock my socks!
إرسال تعليق